Ragdoll Research experiments are easiest to understand as a set of repeatable tests: change one Ragdoll with a mutation, expose it to a machine or hazard, and inspect the result. The Test Chamber guide is the main starting point. Its mutation panel currently shows Wings, Long Arms, Big Head, Tentacles, Diamond, Long Legs, Bug, and Plant. Syringes and serum provide another way to apply some effects, while the Specimen Journal records discoveries.
The practical answer is to begin with one mutation at a time. This makes a visible body change easier to identify and gives you a cleaner result when you use Doctor Mode to inspect the Ragdoll afterward. Add combinations only after you have recorded the single-effect result. The documented results do not establish every recipe, damage value, resistance, or unlock requirement, so an experiment should be treated as an observation rather than proof of a hidden formula.
Mutation panel reference
The table below groups the mutation-panel choices by the result you can look for. “Use” describes the supported way to begin the test, not a guaranteed recipe or a complete unlock condition.
| Mutation | Visible result | Starting point | Test note |
|---|---|---|---|
| Wings | Wings on the Ragdoll | Test Chamber mutation panel | Can be combined with other effects |
| Long Arms | Longer arms and changed movement appearance | Test Chamber mutation panel | Compare a single-effect subject first |
| Big Head | An enlarged head | Test Chamber mutation panel | Can appear alongside other mutations |
| Tentacles | Tentacle-like extra limbs | Test Chamber mutation panel | Useful for observing extra-limb physics |
| Diamond | A diamond-like body form | Test Chamber mutation panel | Specific resistance or damage changes are unconfirmed |
| Long Legs | Longer legs | Mutation panel or syringe effect | Observe posture and movement rather than assuming a bonus |
| Bug | A Bug form or discovery prompt | Mutation experiment and Journal check | The footage does not isolate a stable recipe |
| Plant | Green, plant-like growth | Plant serum or Test Chamber panel | Plant serum is shown changing a Ragdoll into a Plant |
These names describe the observable target, not a promise that every mutation behaves identically on a player avatar. A recording shows mutations appearing on an avatar around Test Chamber 05, but the recorded results do not prove that an avatar receives the same behavior as a Ragdoll. Keep the subject consistent when you are comparing results.
Test Chamber experiments
To run a clean mutation test, enter the lab area and find a Test Chamber. The recorded interface shows a mutation panel in Test Chamber 01; other chambers are shown in gameplay footage, but the sources do not provide a complete chamber-by-chamber unlock list. Place or select a Ragdoll, choose one panel option, and wait for the body change before adding another effect.
Test Chamber mutation experiments
This moment supports the Test Chamber workflow by showing the mutation effects described in this section, including wings, longer arms, larger heads, tentacles, and diamond transformations.

After the result appears, check the Journal. A green NEW JOURNAL PAGE message is the useful checkpoint: it indicates that a new discovery page may have been added. Open Journal from the left-side menu to confirm what was recorded. The Bug footage shows a NEW JOURNAL PAGE — BUG message, but several mutations were active around the same sequence. That proves the discovery occurred in the experiment; it does not prove a unique Bug combination.
Plant has two supported entry points. You can use the Test Chamber panel, or you can use Plant serum after it becomes available. The recorded serum test visibly turns a Ragdoll into a Plant. The serum, panel, and Journal are related but different: the serum is an injection tool, the panel is the chamber interface, and Journal is the record of discoveries. Do not treat a Journal page as proof that every way of producing that form has been found.
Using Plant serum in an experiment
This moment supports the Plant workflow by showing Plant experiments unlocking Plant serum and turning a Ragdoll into a Plant, as described in this section.

For comparisons, write down the starting condition, selected mutation, visible change, and Journal result. Resetting the experiment gives you a new subject for another run, but read the current confirmation before accepting it. If Doctor Mode is enabled, turn it off before using the reset-based kill-farming method shown in the footage.
Machines and hazards
Once a mutation is recorded, move the Ragdoll through the experiment area’s physical tests. The available records identify four machines: Blender, Grinder, Slicer, and Spinning Machine. They provide different interactions, but the sources do not give measured damage values or prove that every machine affects Journal progress. Test one machine at a time when the goal is comparison.
The wider experiment set includes Explosives, Rockets, Sharks, Huge Fan, Cannon, Acid, and Quicksand. These are useful categories for environmental testing: explosive force, launch or impact, animal interaction, wind force, projectile impact, and hazardous surfaces. Some are only confirmed as available experiment types; their exact operation, damage rules, and escape behavior are not fully documented.
Weapons and Powers can be added after a mutation or environmental test. The footage confirms that a mutated Ragdoll can continue to receive weapon and power tests, and Squish is shown as a usable Power. That makes a useful two-stage comparison: first observe the mutation alone, then repeat the same weapon or Power against an unmutated subject. Avoid calling the difference a resistance or damage multiplier unless Doctor Mode or another in-game value actually shows it.
Record and compare results
Doctor Mode is the best supported inspection tool for a before-and-after record. It can show Health, Blood, Awareness, Pain, Shock, and Heart, along with a body diagram and a What Happened history. Select a body part to inspect its details. This lets you compare a press test, a weapon hit, or an environmental hazard without relying only on the animation.

液压压床可用于观察 Ragdoll 在物理测试中的受击结果。
Use the following repeatable order:
- Start with an unmodified Ragdoll and note its visible condition.
- Apply one mutation through the panel, syringe, or serum.
- Confirm the visible form and check for a Journal notification.
- Expose the subject to one machine, hazard, weapon, or Power.
- Open Doctor Mode and record the displayed condition and history.
- Reset only after saving the observation, then repeat with a different variable.
This order separates mutation effects from test-environment effects. For example, a Diamond body may look different, but the recorded results do not confirm that it has a particular resistance. A Long Arms or Long Legs result may change the silhouette and movement, but no measured movement bonus is supplied. Tentacles provide an extra-limb physics test, while Wings provide a visible transformation; neither should be assigned an undocumented combat value.
The reset control is also useful when you want a consistent set of subjects. The footage uses reset after eliminating Ragdolls and says to disable Doctor Mode before repeating that farming method. That is a control interaction, not evidence that every reset restores Journal progress or unlocks. Treat Journal entries, weapon unlocks, and kill milestones as separate outcomes unless the game explicitly links them.
Syringes, Plant serum, and combinations
Syringes let you test effects without depending entirely on the chamber panel. Recorded examples mention Long Legs, Diamond skin, and Tentacles, and show that syringes can be combined into mutations. Plant serum is the clearest demonstrated case: equip it from the available weapons, inject a Ragdoll, and observe the conversion into a Plant.
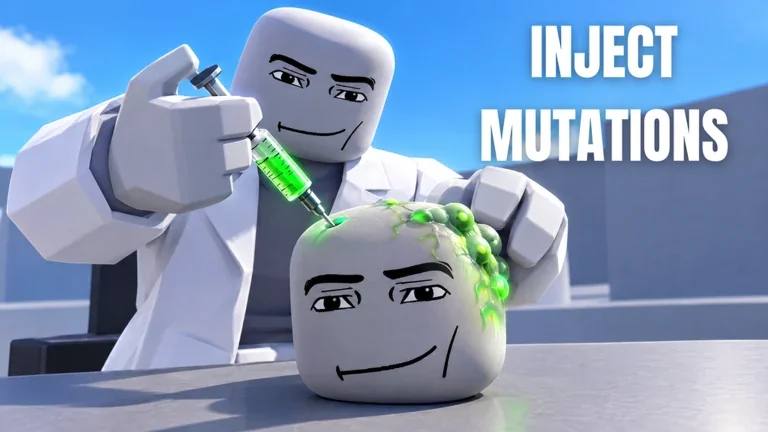
使用注射器向 Ragdoll 注入 mutation,并观察绿色变异效果。
Combinations are valuable for discovery but poor for diagnosis. If Wings, Diamond, Plant, and Tentacles are applied together, a later Journal page or visual change cannot be assigned confidently to one input. Use combinations after the single-effect pass, and preserve the order of application in your notes. The Bug discovery is the main reason for this caution: the recorded success is real, while the exact recipe remains unresolved.
Crystal Kraken and Bug unlock prompts appear in the same body of footage as mutation testing and Journal activity. The current evidence does not establish that one particular mutation combination must reward either weapon. Keep those prompts as outcomes to verify in your own session, not as a guaranteed mutation table.
Limits and current interface notes
The native mutation reference lists eight observable panel options, but it does not provide a complete syringe catalog, fusion-recipe list, Journal total, machine damage table, or experiment unlock chart. The available footage also cannot prove that each mutation has a stable recipe when multiple effects are being applied at once.
The interface may move or change names after the Update 2.5 rework noted by the wiki. If a button is not where this reference places it, follow the current in-game label. Use the actual Test Chamber, Journal, and Doctor screens as the final authority for mutable UI and unlock state.
When an experiment produces several changes at once, classify the result before trying to reproduce it. A visible body change belongs to the mutation observation; a green Journal message belongs to discovery tracking; an unlock popup belongs to progression; and a Doctor screen belongs to condition inspection. These checkpoints can happen during one session, but they answer different questions. Keeping them separate prevents a weapon popup from being mistaken for a mutation reward or a Journal page from being treated as proof of a recipe.
The same rule applies to environmental tests. A Huge Fan can demonstrate force and movement, while Acid or Quicksand can demonstrate interaction with a hazard, but the current records do not supply a shared damage scale for them. Start with a fresh subject when you change from a machine to a hazard. If the Ragdoll is already injured, note that condition before the next test or reset the experiment and begin again. A clean baseline is more useful than a longer chain of mixed effects.
For a reliable personal reference, record the chamber number, subject type, single mutation or serum, visible form, Journal message, test object, and Doctor values. This does not unlock anything by itself; it simply makes repeated observations comparable when the interface or experiment state changes.
Ragdoll Research experiments FAQ
How do I confirm that a mutation was recorded?
Watch for the green NEW JOURNAL PAGE notification, then open Journal and check the new entry. The notification is a discovery checkpoint, not a complete recipe list.
Does the Diamond mutation guarantee extra resistance?
No confirmed resistance value is available here. Record the Diamond form, run a controlled test, and use Doctor Mode to compare the displayed condition instead of assuming a damage reduction.
Can I use Plant serum instead of the Test Chamber?
Yes. Plant serum is shown turning a Ragdoll into a Plant. The serum is an injection tool, while the Test Chamber is the mutation interface, so they should be treated as separate ways to start the experiment.
Why should Doctor Mode be off before resetting?
The recorded reset-based farming method specifically says to disable Doctor Mode before using Reset Experiment. Follow the current prompt and settings in your session because interface behavior can change.